
티스토리 뷰
Postgresql & lunchy 설치
출처: https://www.moncefbelyamani.com/how-to-install-postgresql-on-a-mac-with-homebrew-and-lunchy/
요약: Mac에서 homebrew를 이용해 postgresql을 설치 하고 Lunchy를 사용해서 postgresql을 시작, 정지할 수 있도록 한다. lunchy가 복잡한 시작 명령어를 간결하게 해준다.
설치후 DB를 생성하고 접속해야 한다.
MacBook-Pro:~ USERNAME$ createdb
MacBook-Pro:~ USERNAME $ psql
psql (9.6.2)
Type "help" for help.
USERNAME=#
This is a quick guide for installing PostgreSQL (Postgres for short) on a Mac with Homebrew, and starting and stopping it with Lunchy. If you've just forked a Ruby on Rails project that requires Postgres, this tutorial will get you up and running in no time.
If you're working on a brand new Rails app and need to create a new Postgres user and database for your app, I recommend Will Jessop's tutorial or Peter Cooper's screencast.
Step 1: Install Hombrew
To make sure you have all the tools necessary for Ruby on Rails development, I recommend you follow my tutorial for installing Xcode, Homebrew, Git, RVM, and Ruby on a Mac.
Step 2: Update Homebrew
Before you install anything with Homebrew, you should always make sure it's up to date and that it's healthy:
$ brew update
$ brew doctor
Step 3: Install Postgres
$ brew install postgresql
When you install Postgres, you will see a bunch of output in your Terminal that looks like this:
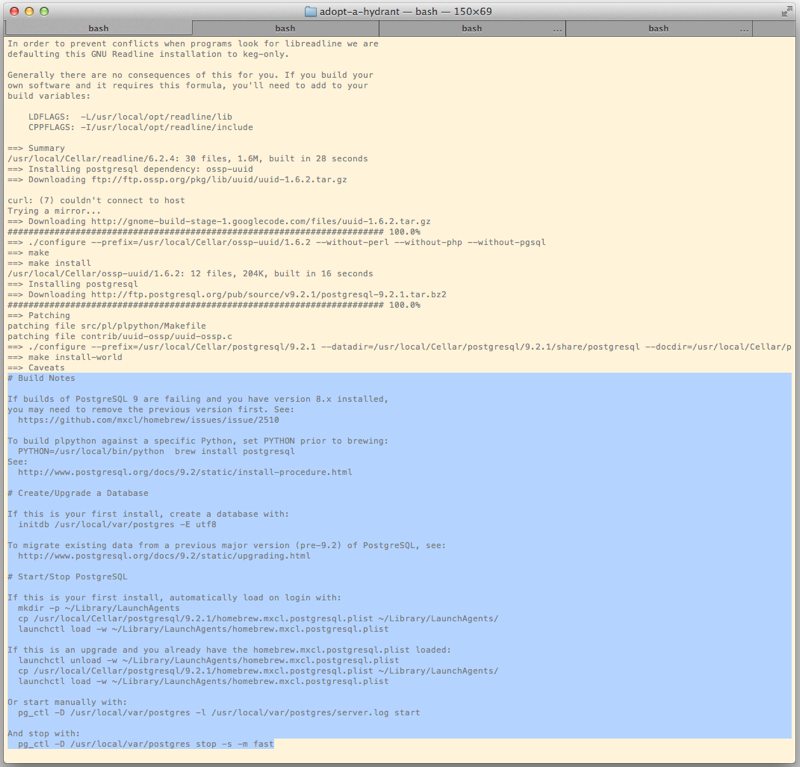
The important sections are Build Notes, Create/Upgrade a Database, and Start/Stop PostgreSQL. Make sure to follow those instructions to the letter.
Step 4: Create/Upgrade a database
If this is your first time installing Postgres with Homebrew, you'll need to create a database with:
$ initdb /usr/local/var/postgres -E utf8
I copied and pasted that command directly from the Terminal output. You should do the same, in case the instructions change in the future.
Step 5: Install Lunchy
$ gem install lunchy
Lunchy is a helpful gem that will allow you to easily start and stop Postgres.
Step 6: Start/Stop Postgres
Once again, I'm copying and pasting the following commands from my Terminal. Note that the second command is specific to the version of Postgres that was installed on my machine. If the version number has changed since I've written this tutorial, using the command below won't work for you, so you should make sure to copy the command from your Terminal output.
$ mkdir -p ~/Library/LaunchAgents
$ cp /usr/local/Cellar/postgresql/9.2.1/homebrew.mxcl.postgresql.plist ~/Library/LaunchAgents/
Since we're using Lunchy, we don't need to run this third command:
$ launchctl load -w ~/Library/LaunchAgents/homebrew.mxcl.postgresql.plist
Instead, we'll simply use this to start Postgres:
$ lunchy start postgres
At this point, you should be all set to run the rake commands to create and use the database for the existing Rails app you're working on.
To stop Postgres:
$ lunchy stop postgres
'Programming' 카테고리의 다른 글
| Tomcat 실행 에러: java.net.MalformedURLException (0) | 2017.03.28 |
|---|---|
| 탐색 알고리즘(순차, 이진, 이진 탐색 트리, 해시 탐색) (0) | 2017.03.09 |
| Java 십진수 변환 (2진수, 8진수, 16진수) (0) | 2017.03.08 |
| 거품 정렬 (Bubble Sort) /삽입 정렬 (Insertion Sort) / 선택 정렬 (Selection Sort) (0) | 2017.03.08 |
| 분할정복 알고리즘 - 퀵 정렬 (Quick Sort) (0) | 2017.03.07 |